After publishing your first blog post, you might be eager to enhance your website with common features like contact pages, galleries, sliders, email subscription lists, forums, and more.
To incorporate these elements, you’ll need to utilize plugins.
Think of plugins as apps for your WordPress site, enabling the addition of new functionalities without the need to code.
With over 59,000 WordPress plugins available in the official free directory, you can find a plugin for virtually any feature you desire.
Check out our detailed guide on installing a WordPress plugin for step-by-step instructions.
Now, let’s explore how to use plugins to integrate key functionalities into your WordPress blog.
How to Create a Contact Form in WordPress
Every website benefits from having a contact form, as it offers a direct way for users to reach out to you. WordPress, by default, doesn’t include a contact form feature, so you’ll require a WordPress form builder plugin to integrate one into your site.
We suggest starting with WPForms Lite. This free variant of the widely acclaimed WPForms plugin tops our list of the best contact form plugins for WordPress, boasting over 6 million active installations.
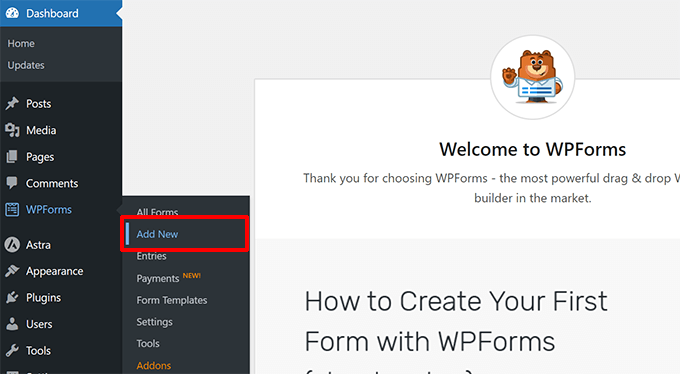
To add WPForms to your site,
simply navigate to Plugins » Add New in your dashboard and search for WPForms. Then, click “Install” followed by “Activate.” Once activated, proceed to WPForms » Add New to craft your inaugural form.
Opening the WPForms builder interface is your next step.
Begin by naming your contact form, then select the ‘Simple Contact Form’ template with a click.
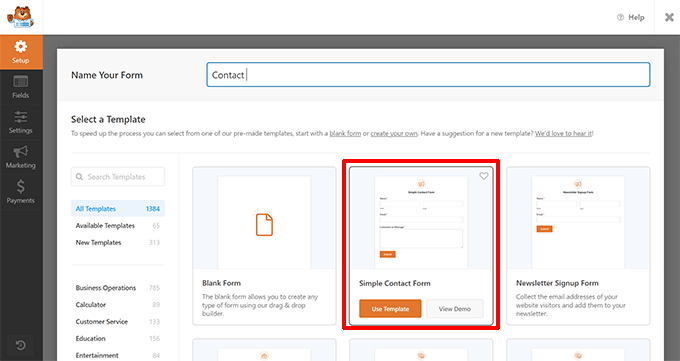
WPForms will automatically generate a basic contact form for you, equipped with all the necessary fields.
To modify a field or add a new one, simply click on the desired field or select from the options available in the left column.
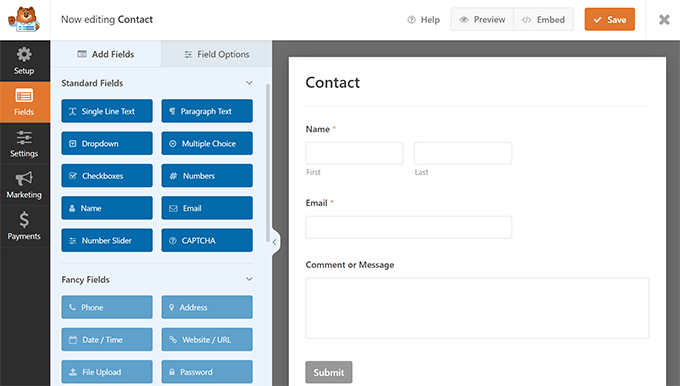
After finalizing your edits to the form, click the save button located in the top right corner before exiting the form builder.
Next, create a new page in WordPress by navigating to Pages » Add New Page and title it ‘Contact.’
In the editing interface, proceed to insert the WPForms block into the page editor.
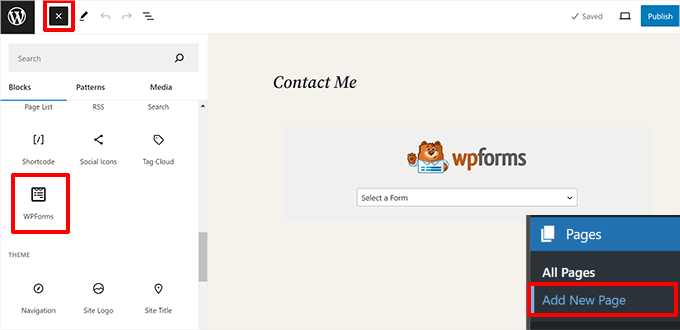
Then, choose the form you previously crafted from the drop-down menu provided.
WPForms will display a live preview of your form directly within the editor.
Now, you’re ready to save, publish, and view your page in a web browser to witness your contact form live.
It’s wise to conduct a test submission to ensure you’re receiving notifications correctly. If you don’t receive a notification, refer to our troubleshooting guide on resolving WordPress email delivery issues.
For more comprehensive instructions, you might want to consult our detailed guide on creating a contact form in WordPress.
One of the great advantages of using WPForms as a blogger is its scalability. Beyond basic contact forms, it enables you to craft reader surveys, polls, guest post submission forms, and much more, adapting to your growing needs.
How to Setup Google Analytics Tracking
Google Analytics is a crucial tool for tracking your blog’s visitor count, understanding where your audience comes from, and analyzing their behavior on your site.
Installing Google Analytics from the outset is advisable so you can monitor your blog’s growth over time.
Begin by heading to the Google Analytics website and logging in with your Gmail account.
After logging in, proceed to register for a free Google Analytics account.

You’ll be prompted to enter your details and website URL. Subsequently, you’ll receive your Google Analytics tracking code.
However, you can pause at this point, as we’ll use a plugin to seamlessly integrate this code into your blog, ensuring proper WordPress tracking is established.
In your WordPress admin area, proceed to install and activate the MonsterInsights plugin. This free plugin is the premier Google Analytics plugin for WordPress, offering the simplest method for integrating Google Analytics into your site, and is trusted by over 3 million websites.
After activating the plugin, navigate to Insights » Settings to adjust the plugin’s configuration.
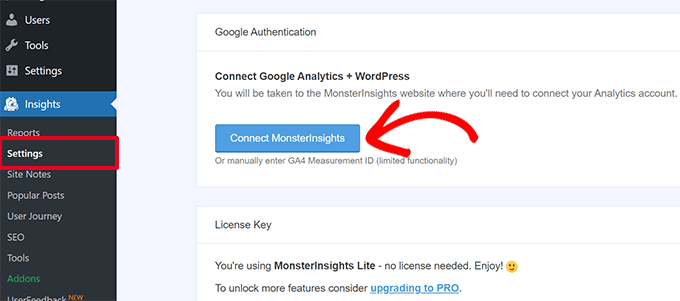
On the settings page, select the ‘Connect MonsterInsights’ button to link Google Analytics with your WordPress site.
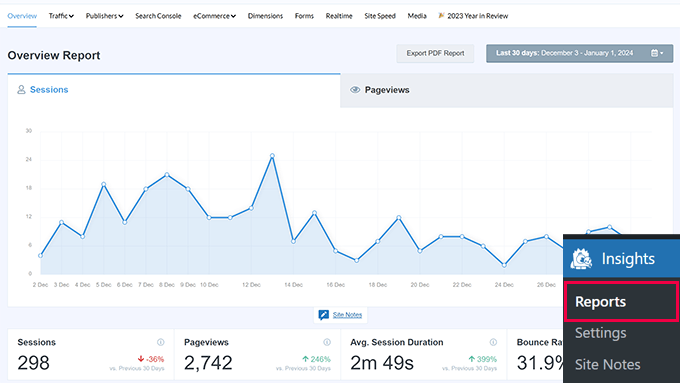
Adhere to the prompts provided to finalize the setup. Upon completion, you’ll gain access to your website’s analytics reports directly from your WordPress dashboard, under the MonsterInsights tab.
For comprehensive guidance, refer to our tutorial on installing Google Analytics in WordPress.
How to Optimize Your WordPress Blog for SEO
Many beginners overlook SEO, or search engine optimization, during the initial stages of blog creation. SEO is essential for making your blog visible in search engine results.
For increased traffic, it’s vital to focus on SEO optimization for your blog from the start.
Begin by installing and activating the All in One SEO plugin. This comprehensive WordPress SEO plugin assists in optimizing your blog effectively.
The plugin features a straightforward configuration wizard, guiding you through the initial setup process.
It aids in setting up a WordPress sitemap, crafting precise keywords and meta descriptions, incorporating schema markup, and more.
We highly suggest following our detailed WordPress SEO tutorial to fully optimize your blog’s SEO.
While there are other SEO plugins like Yoast SEO and RankMath available, we prefer AIOSEO for its user-friendly interface, especially suitable for beginners. It’s the choice for all our blogs, including WPBeginner.
The free version of AIOSEO is quite robust, serving over 3 million websites effectively.
Beyond using a WordPress SEO plugin, enhancing your blog’s content with a keyword research tool can offer further optimization. These tools assist in identifying new content ideas based on what people are actively searching for within your niche.
They even allow you to view the specific keywords your competitors rank for, enabling you to craft superior content and outperform them.
This strategy ensures you maximize your new blog’s traffic from the outset. For more insights, check out our beginner’s guide on conducting keyword research for your blog.
More WordPress Plugins and Customizations
Navigating the vast array of WordPress plugins available can often be daunting for beginners.
At WordPress-Guide, we regularly highlight essential WordPress plugins to enhance your site’s functionality.
Here’s a curated list of top WordPress plugins you should explore:
- Backup: Duplicator stands out as the premier WordPress backup plugin. Regular backups are crucial for website recovery in case of any mishaps.
- Security: Sucuri Security offers a comprehensive, free security scan for WordPress sites. Our detailed WordPress security guide for beginners will assist in safeguarding your blog.
- Performance: To boost WordPress speed, we suggest WP Rocket (premium) or WP Super Cache (free). Dive deeper into enhancing your site’s speed and performance with our guide filled with actionable steps.
- Design & Customization: For website design modifications, consider SeedProd or Divi page builder. These tools are perfect for crafting custom homepages, landing pages, or themes without coding. Explore our comparison of top WordPress page builders for more insights.
- Traffic & Subscribers: PushEngage is our top recommendation for engaging visitors with push notifications after they’ve left your site, a strategy that ranks as one of the top five traffic sources for WPBeginner. Learn how to integrate push notifications in WordPress for better engagement.
- Email Marketing: For email marketing, Constant Contact or HubSpot are excellent choices. To increase your email subscriber list, OptinMonster’s free plugin is ideal for creating effective popups, scroll boxes, and calls to action.
Install cloudways and get 20% discount for the first month
To learn more head over to the Cloudways website.
You can get started with your own 3 day trial simply by signing up with an email (no credit card required).
Beginner’s Guide Step
- Pick Your Blog Name and Platform (Beginner’s Guide Step 1)
- Install WordPress Blogging Software (Beginner’s Guide Step 2)
- Selecting Your WordPress Theme (Beginner’s Guide Step 3)
- Creating Your First Blog Post (Beginner’s Guide Step 4)
- Making Money From Your Blog (Beginner’s Guide Step 6)
- How to Set up Cloudways WordPress Cloud Hosting [Tutorials]