
Install cloudways and get 20% discount for the first month
To learn more head over to the Cloudways website.
You can get started with your own 3 day trial simply by signing up with an email (no credit card required).
The web offers a vast array of hosting solutions, encompassing a multitude of categories including shared hosting, Managed WordPress hosting, VPS, dedicated servers, and, notably, cloud hosting. Among the leading choices for managed cloud hosting, Cloudways stands out prominently.
Established in 2011, Cloudways has consistently delivered premier managed cloud hosting services. Today, we aim to explore the essence of what Cloudways offers and why it’s a top choice for many.
Exploring Cloudways Hosting: An Overview
Cloudways stands out as a leading provider in the realm of cloud hosting. But what exactly is cloud hosting? In essence, it’s hosting that operates through the “cloud” — a vast network of physical servers acting in unison to host virtual servers.
This setup offers enhanced stability and security, ensuring high performance and minimal downtime. Moreover, it provides this superior service at a reduced cost, while also offering unmatched flexibility in web hosting.
The Unique Advantages of Cloudways
Cloudways elevates cloud hosting to a new level, distinguishing itself from other well-known hosting providers with its enhanced managed cloud hosting solutions and standout features.
At the core of their service, Cloudways utilizes cutting-edge servers and technologies including Nginx, Redis, MySQL, Varnish, Memcached, and Apache. This powerful performance stack is complemented by the pre-installed Breeze Cache Plugin, offering advanced capabilities like file exclusion, grouping, minification, and Gzip compression for optimized file sizes. This combination ensures Cloudways hosting is both speedy and reliable.
What sets Cloudways apart from competitors is its comprehensive managed server-side security across all plans. They employ multiple layers of security measures including firewalls, two-factor authentication, and IP whitelisting, plus automatic updates to keep servers up-to-date.
Furthermore, Cloudways offers an unmatched variety of platform choices (including DigitalOcean, Linode, VULTR, Amazon, and Google), unlimited installations, and features designed for team collaboration. Their platform facilitates easy server scaling, provides a user-friendly account console, and offers free SSL certificates through Let’s Encrypt, making it a compelling choice for hosting needs.
Cloudways Managed Cloud Hosting Options
Having explored what Cloudways offers, it’s worth taking a closer look at their plans. A standout aspect of Cloudways is the diversity of hosting solutions they provide, catering to the budget and data requirements of any website.
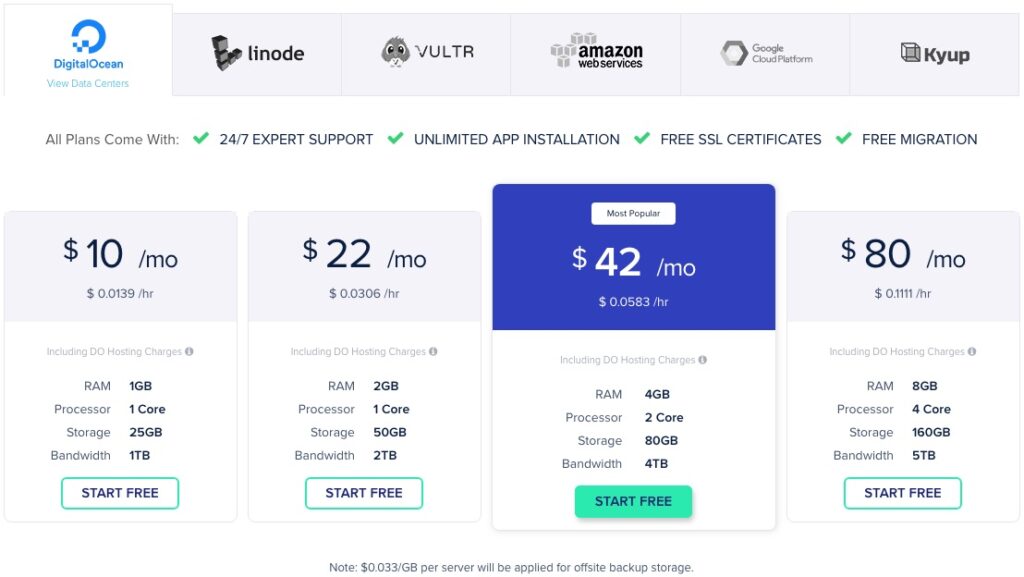
Cloudways offers cloud server options beginning at just $10 per month, alongside the flexibility to contact them for a custom-built plan or select from various intermediate server plans. Every managed cloud hosting plan from Cloudways allows for an unlimited number of website installations, making it effortless for developers to set up multiple staging sites for clients seamlessly. Moreover, if you’re looking to transition your blog to Cloudways, you’ll appreciate their complimentary service of migrating one website to your new server at no extra cost.
Guide to WordPress Hosting with Cloudways
If Cloudways seems like the ideal hosting solution for your website, or if you’re simply curious to explore what their hosting can provide, our setup guide is your next step. It will guide you through the process of configuring your cloud server with Cloudways. Ready to begin?
Register for a Free Account on Cloudways
Begin by visiting the Cloudways homepage and click on the link to start for free. This will direct you to the Cloudways main signup page. While there’s an option to sign in using your LinkedIn or Github account, we recommend the traditional method of signing up with an email.
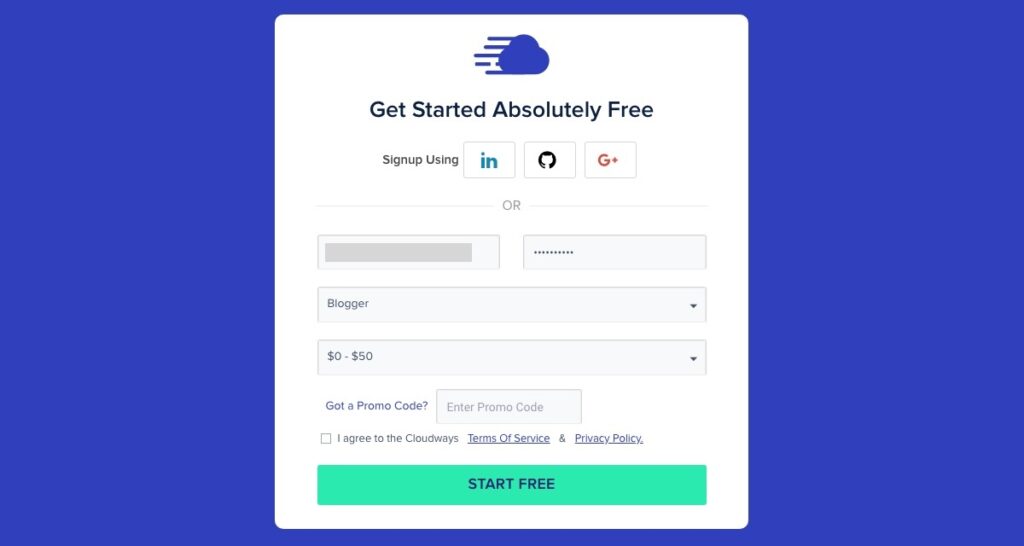
Just input your email address and create a password. Shortly after, you’ll receive an activation email within a few minutes.
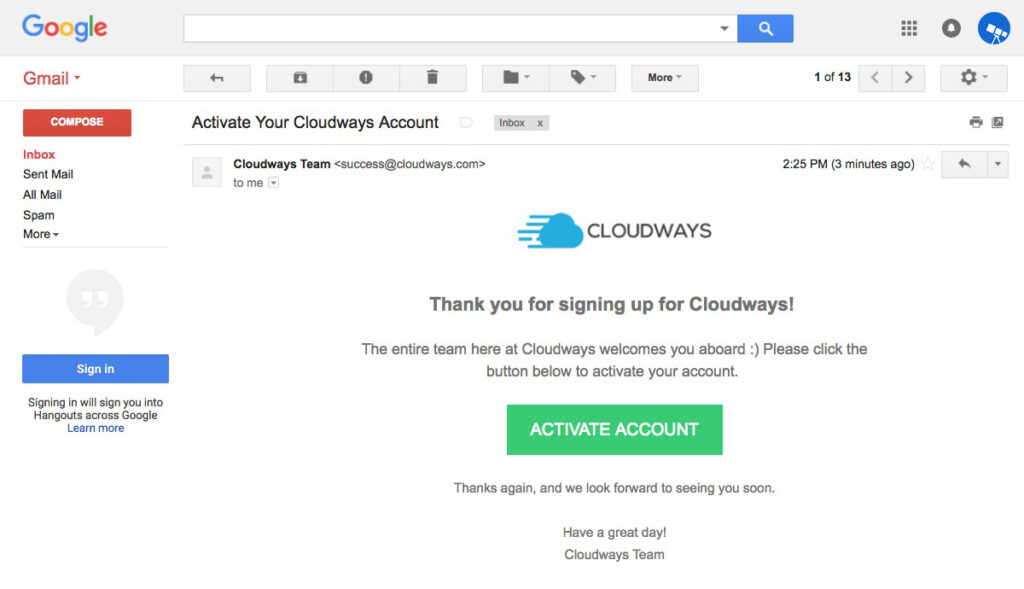
Upon receiving your activation email, click on the prominently displayed green button to activate your account immediately.
Note : Should you encounter any errors during signup, or if the verification email doesn't arrive promptly, there's no need for concern. Just access the 24/7 customer support chat box located at the bottom right corner of any Cloudways page. A Cloudways support technician will be available to assist you.
Set up Your Cloudways Hosting Server
Now, let’s begin the process of actually configuring your server for hosting your website (or websites). After selecting the “Activate Account” link in your email, you’ll be directed to the screen outlined below.
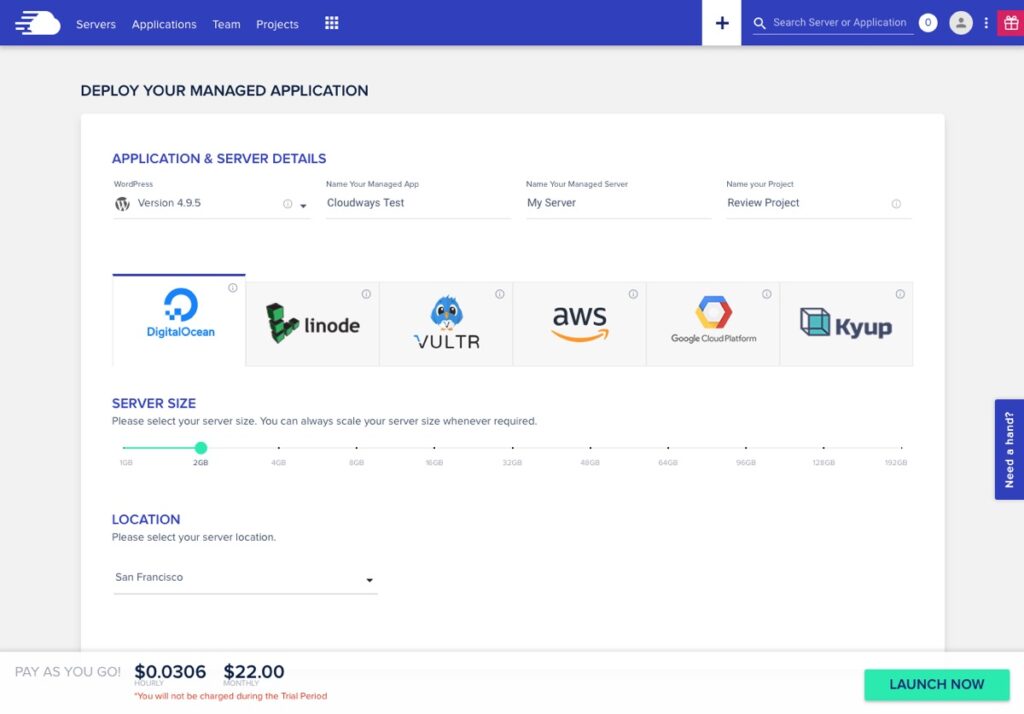
First, you’ll choose your application. Recognizing WordPress’s popularity, Cloudways places it prominently at the top, offering four options:
- Standard WordPress
- WordPress with WooCommerce
- WordPress Multisite
- Clean WordPress (without Cloudways optimizations)
Select the version that best suits your needs. If in doubt, the Standard WordPress is a solid starting point, as it’s straightforward to integrate WooCommerce or activate multisite functionality later (we also offer a guide for setting up WordPress multisite should you need assistance). The Cloudways optimizations are a bonus we recommend taking advantage of.
Next, name your application, server, and project with custom labels that make sense to you, facilitating easy recall of the specific website setup.
Following your app choice, you’ll encounter selections for your cloud provider, server size, and datacenter locations. To allow for a thorough evaluation, all plans include a free 3-day trial. The current cloud provider options are:
- Digital Ocean: SSD-based storage across 7 datacenters in 3 countries
- Linode: Cloud services from 8 datacenters across 3 regions
- VULTR: SSD-based storage with 13 datacenters globally
- Amazon EC2: Customizable disk sizes with 8 datacenters in 6 countries
- Google Cloud: 4 locations across 3 continents, tailored for large-scale or resource-heavy websites
While all Cloudways’ cloud platforms offer comparable services, the primary distinctions lie in pricing and reliability. Digital Ocean and VULTR are excellent for developers on a budget due to their nearly unlimited bandwidth at lower costs. Conversely, Amazon and Google operate on a pay-as-you-go basis for bandwidth, which may result in higher monthly fees, but ensures your site remains unthrottled as you’re billed for each utilized resource.
Choosing the right server size is crucial; opt for a plan that you believe will fulfill your needs. If uncertain, start with a smaller plan—you can always scale up your server with additional resources as required. Cloudways facilitates server upgrades directly from your server console, which will be demonstrated later.
The final step involves selecting a server location. Opt for a server nearest to your primary audience to ensure the best site performance. For instance, if the majority of your traffic is from the USA, then choosing a server location within the country is advisable.

With your selections made, you’re all set to launch your server! You’ll be redirected to your console, where an estimated setup time for your server will be displayed (our estimate was 7 minutes, and our actual setup time was about 8 minutes—quite accurate!). During this brief wait, you have the opportunity to fill out your account profile with details about your company.
After your server setup concludes, you can proceed to manage it. Simply click on your newly prepared server to access the console.
Managing Your Cloudways Server
Upon your initial visit to the Cloudways server console, a walkthrough guide will automatically launch. This tutorial is designed to acquaint you with the server summary, navigation bar, the actions you can take, and other pertinent details.
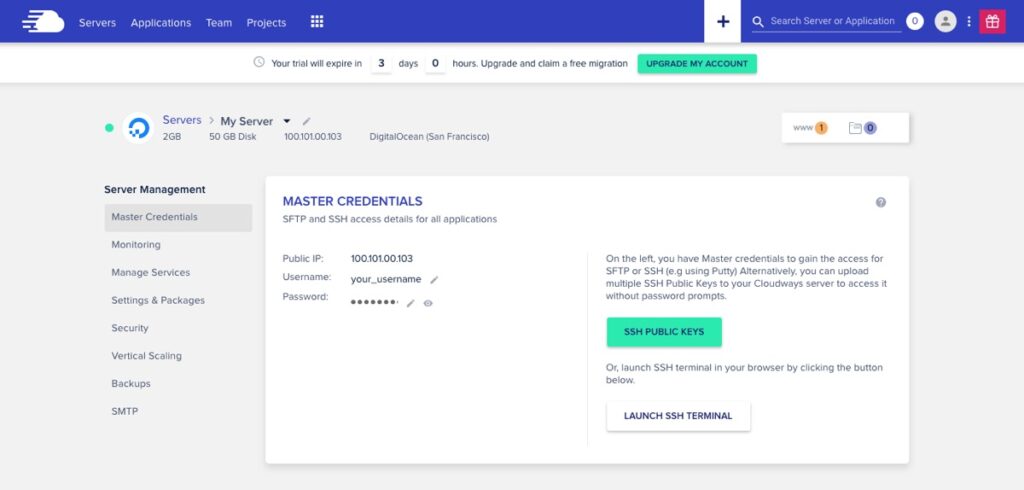
Initially, your console will display your Master Credentials by default. In this section, you can modify your username and password, handle SSH keys, and see your IP address.
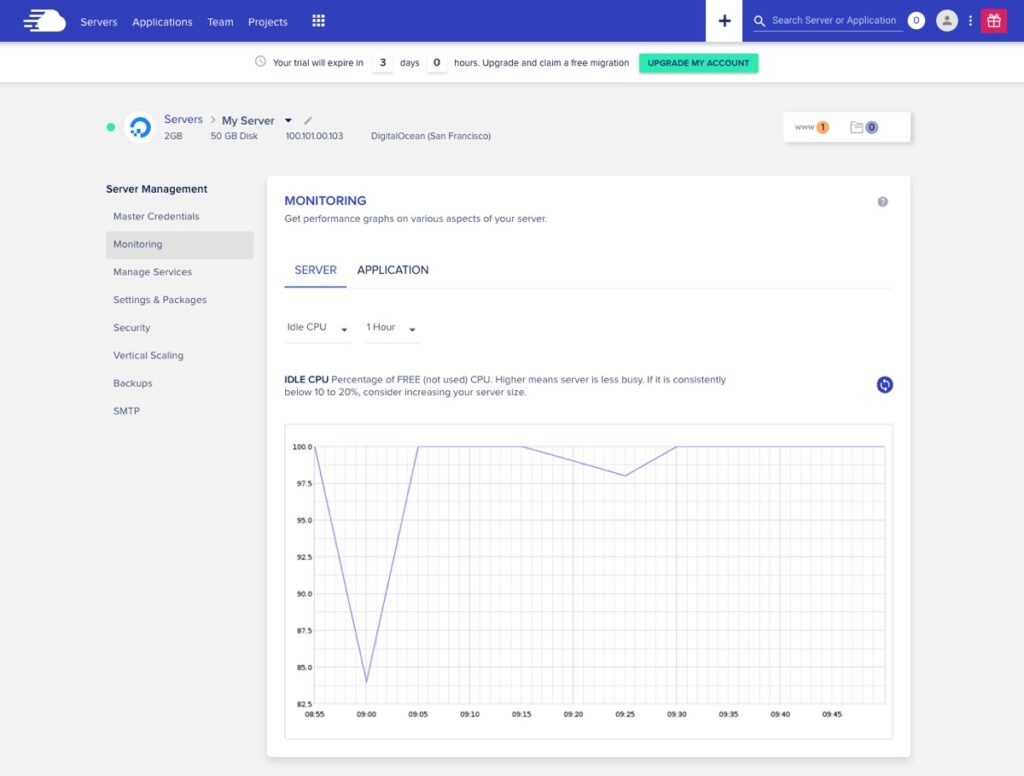
The Monitoring tab is your next stop. It offers a wealth of graphs and options for tracking your server and applications. Among these, two crucial metrics stand out. The first is Idle CPU. In our case, the graph shows that the server’s CPU is mostly free, ranging between 95-100%, indicating ample capacity for our website’s current operations. Conversely, if the graph showed a significant number of instances where the free CPU was at 0%, it would signal the need to upgrade to a larger server plan.
The second important metric is Free Memory. Smaller server plans may run smoothly with just 15-50MB of free memory. However, for businesses on plans with 4GB or more, the free memory should consistently remain above 100MB. Falling below this threshold could be a sign that it’s time to consider scaling up your plan.
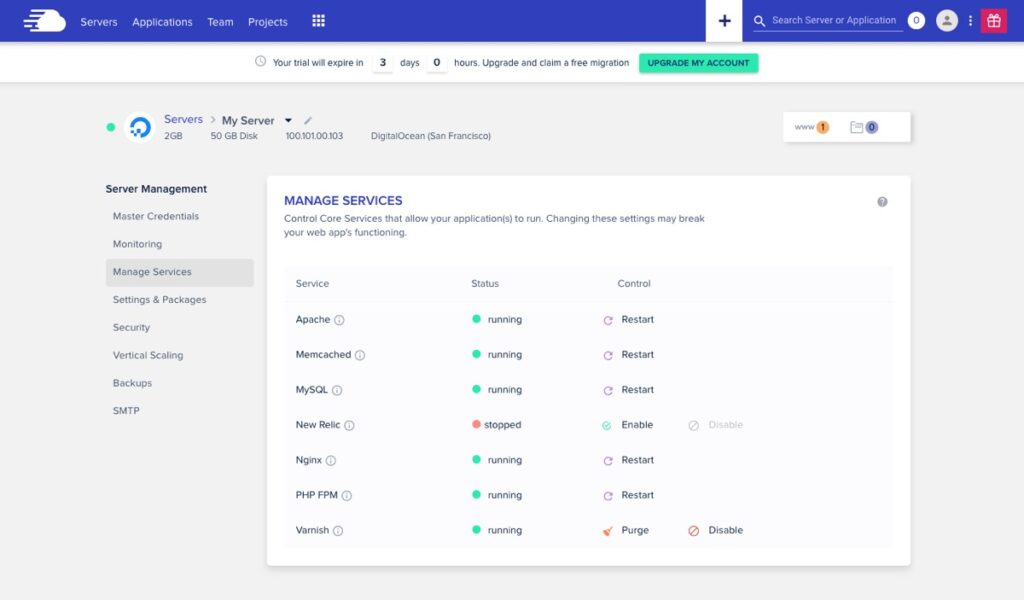
Following the Monitoring section, you’ll find the Manage Services tab. Here, you’re presented with the various essential Cloudways services that ensure your server’s optimal performance. This encompasses Apache, caching, the database, and the option for application monitoring through New Relic. Within this tab, you have the ability to restart these services and purge your cache, maintaining the smooth operation of your server.
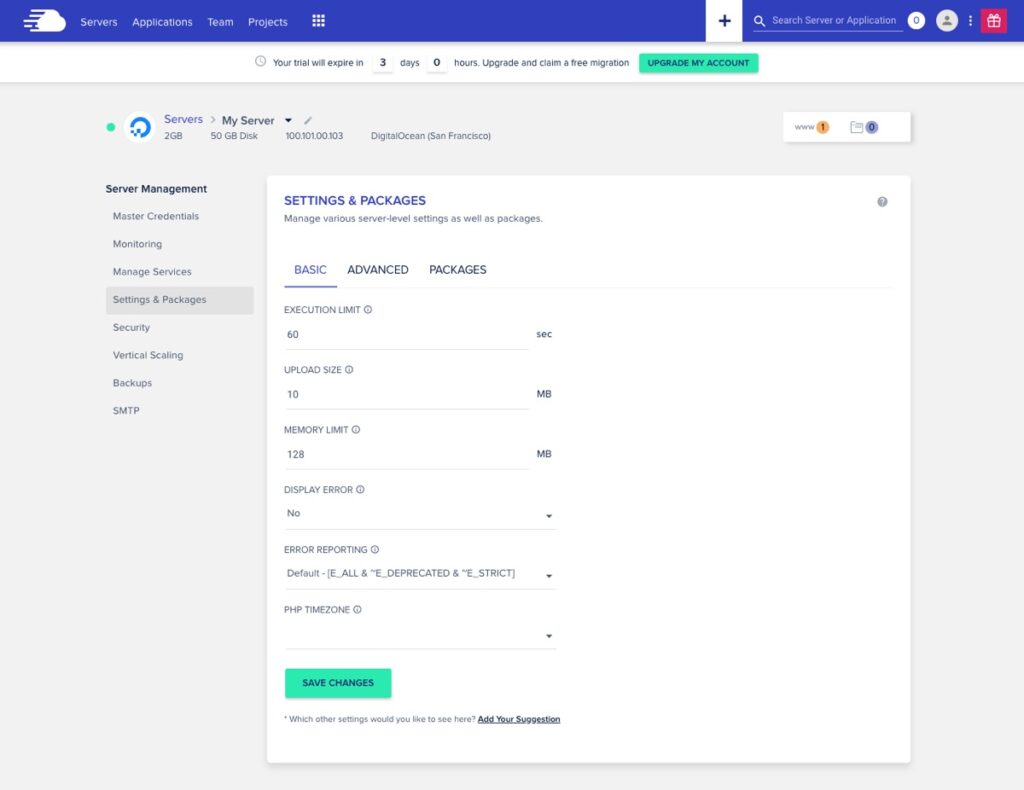
If you’re working with WordPress, you might find yourself needing to tweak server settings to upload certain files or install sizable plugins or themes. You can find all these server configurations and more within the console’s Settings & Packages tab. Remember to save any changes you make.
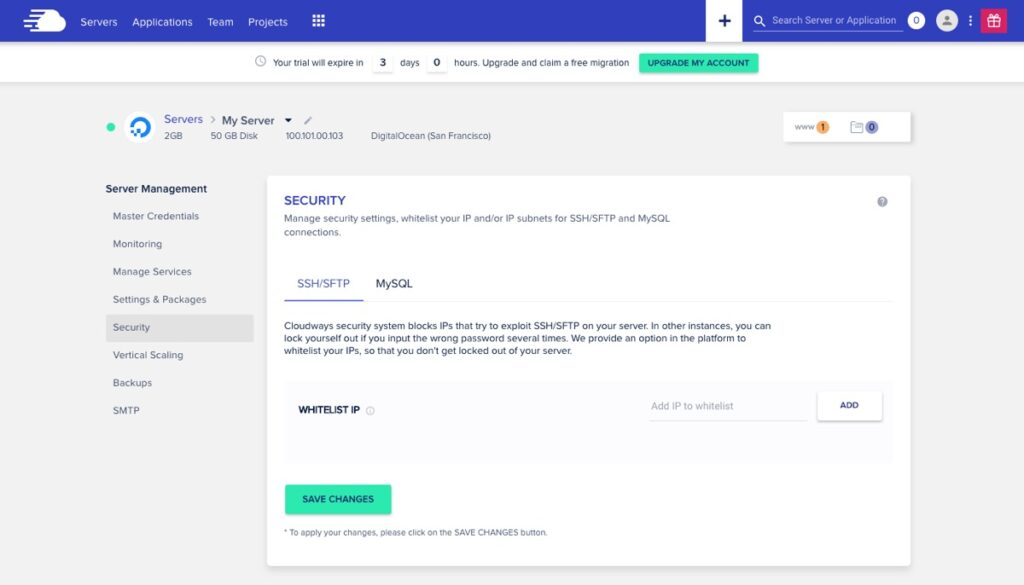
Security is paramount for any website, and Cloudways facilitates robust server security measures with ease. By maintaining firewalls and regularly implementing server patches, Cloudways ensures your installations remain secure. Additionally, they monitor for suspicious activities on your server, meaning multiple failed login attempts (like those made when you forget your password) could lead to being locked out of your account. To avoid such situations, you have the option to edit the Security settings in your server manager to whitelist your IP address. This step is completely optional, and many users may choose to bypass this section.
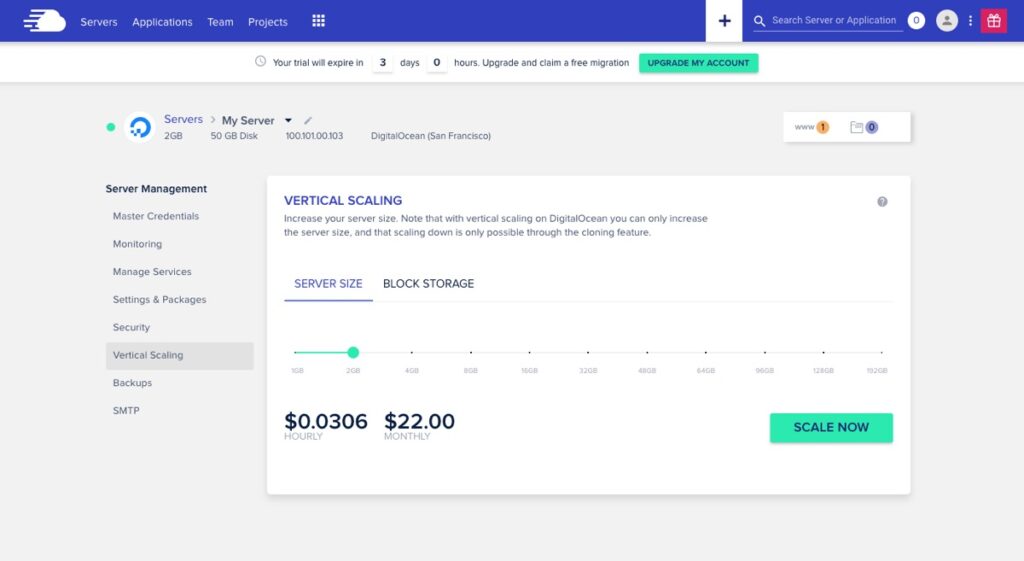
Should you require additional server space, you can effortlessly upgrade your Cloudways plan at any moment via the Vertical Scaling section. Simply choose the enhanced server size you need and click to implement your changes, which will be reflected in your next monthly bill.
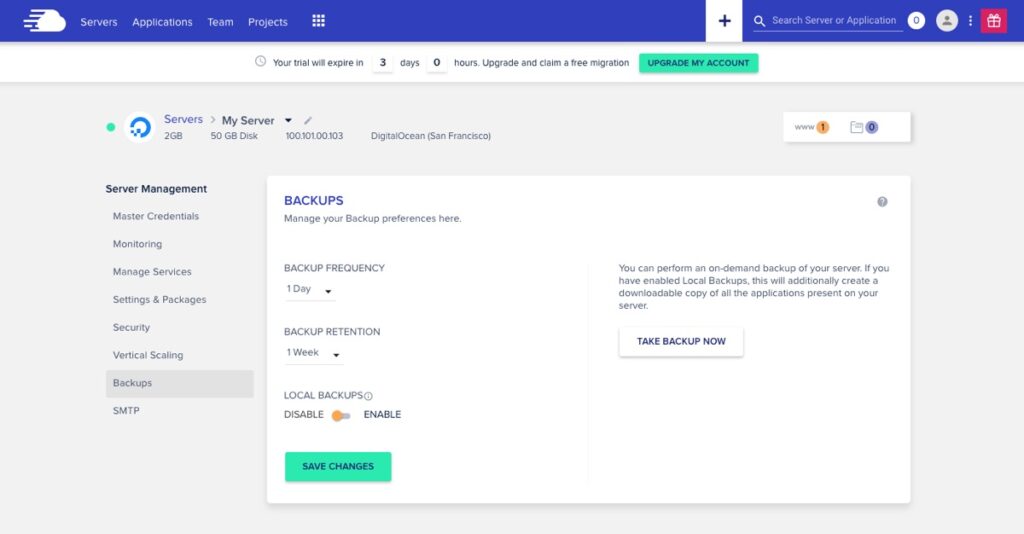
Cloudways incorporates built-in backup functionalities within its server options, executing daily backups as a standard practice. Within this tab, you have the flexibility to adjust the frequency of these backups to as often as every hour or as infrequent as once a week. Additionally, the option for Local Backups is available, creating a downloadable copy of your most recent backup via SFTP/SSH for personal storage on your computer.
Despite the robustness of the included backup services, we advocate for the utilization of an external service like VaultPress to guarantee you have a comprehensive copy of your website readily accessible at all times.
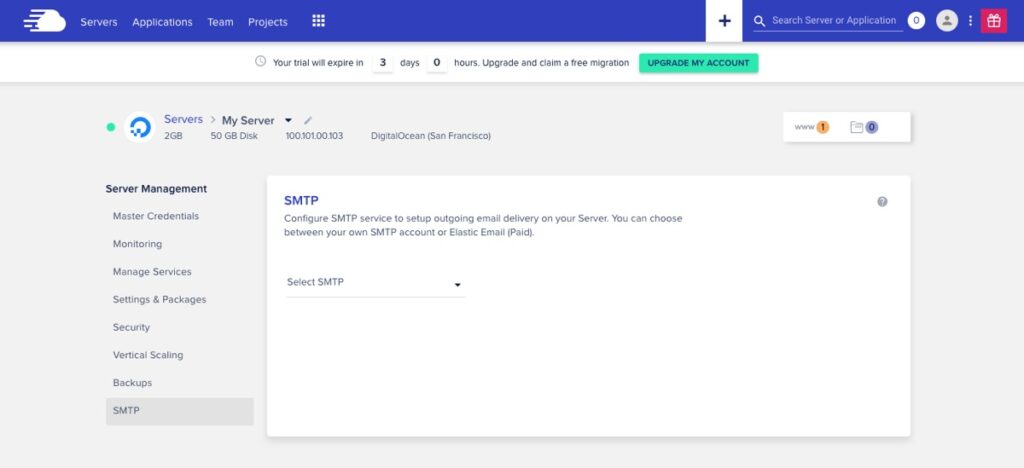
The SMTP section marks the final part of your server management tools. This built-in feature allows you to utilize a third-party email service as a gateway for sending emails from your server. Simply select the option to choose your own SMTP, then input and configure your email provider’s details, or opt for elastic email by enabling it from your add-ons—a topic we’ll cover shortly.
Cloudways Add-Ons
Cloudways provides a selection of useful Add-ons, accessible through the server manager. To activate any add-ons, simply click on the grid icon located in the main menu.
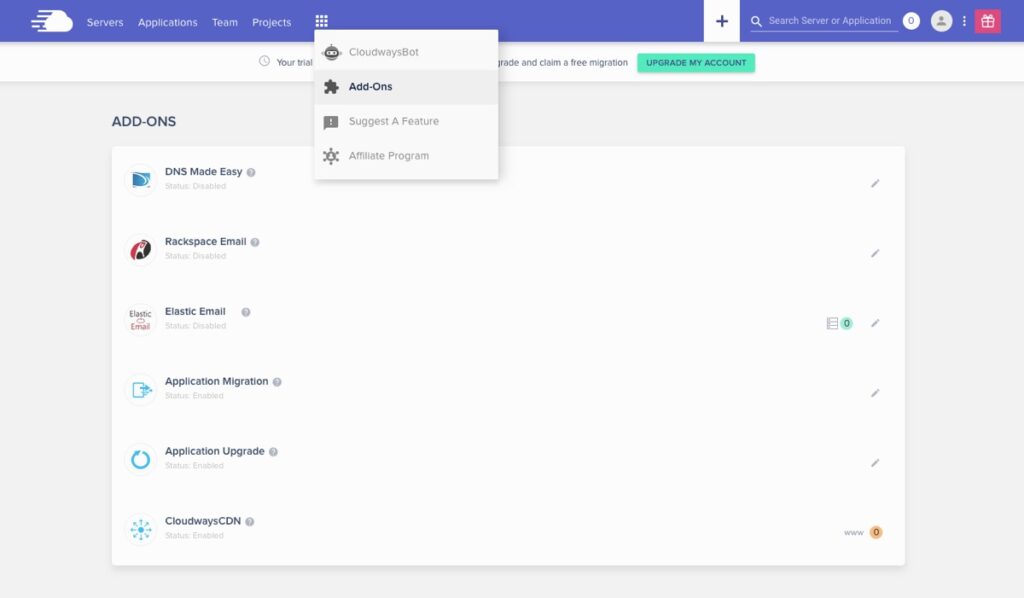
Cloudways offers a suite of six valuable Add-ons, accessible through the server manager, with the latter three providing additional configuration options upon activation:
- DNS Made Easy: By default, Cloudways doesn’t provide a domain name system (DNS) service to manage your domain names. However, they enable you to use a third-party DNS service (like GoDaddy) or subscribe to their DNS Made Easy service. This add-on begins at $2.50 per month for up to 5 domains and requires manual activation by Cloudways, setting the add-on to pending until approved by a support member.
- Rackspace Email: For integrating email services into your website, Cloudways offers the Rackspace Email add-on at just $1 per month for each email. Similar to DNS Made Easy, this add-on awaits manual activation and will be set to pending until a Cloudways support member facilitates your mailbox setup.
- Elastic Email: For those needing to send a high volume of emails monthly, the Elastic Email add-on is an efficient solution, starting at $0.10 per month for 1000 emails, with discounts for higher volumes. Activation is straightforward; simply enable the add-on and wait for Cloudways support to verify your subscription. This add-on is managed through the Server Management Add-Ons section.
- Application Migration: To transfer your WordPress site from another host, this add-on offers the simplest pathway to Cloudways. The first migration is complimentary, with subsequent migrations priced at $25 each, or $49 for multisite migrations.
- Application Upgrade: For those requiring a specific version of WordPress, this premium service, starting at $50, allows a Cloudways professional to manage your upgrade.
- CloudwaysCDN: Check this section to see which of your WordPress installations are connected to CloudwaysCDN. Utilizing a CDN is an effective strategy to enhance your WordPress site’s speed. If your plan includes CloudwaysCDN, it’s highly recommended to make use of it.
After diving into your Server settings and services, you’re ready to explore your Application settings!
Managing Your WordPress Installations
By selecting Applications from the main menu, you’ll be directed to your application manager. This area allows you to access all of your server installations, including WordPress and any other applications you may have set up.
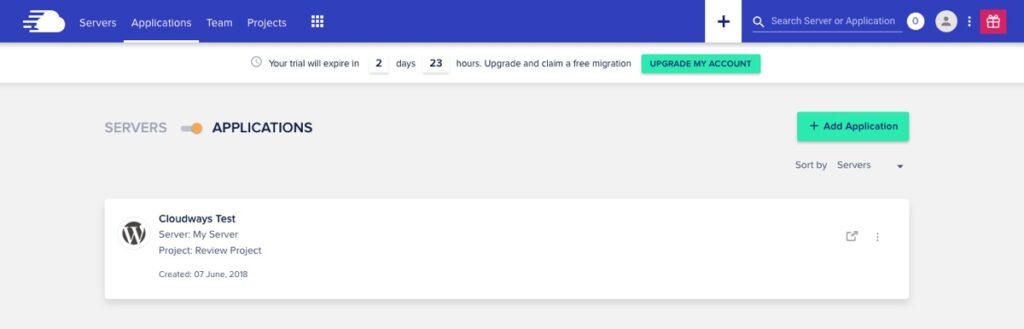
Just click on any of your installed applications to view its associated details and settings.
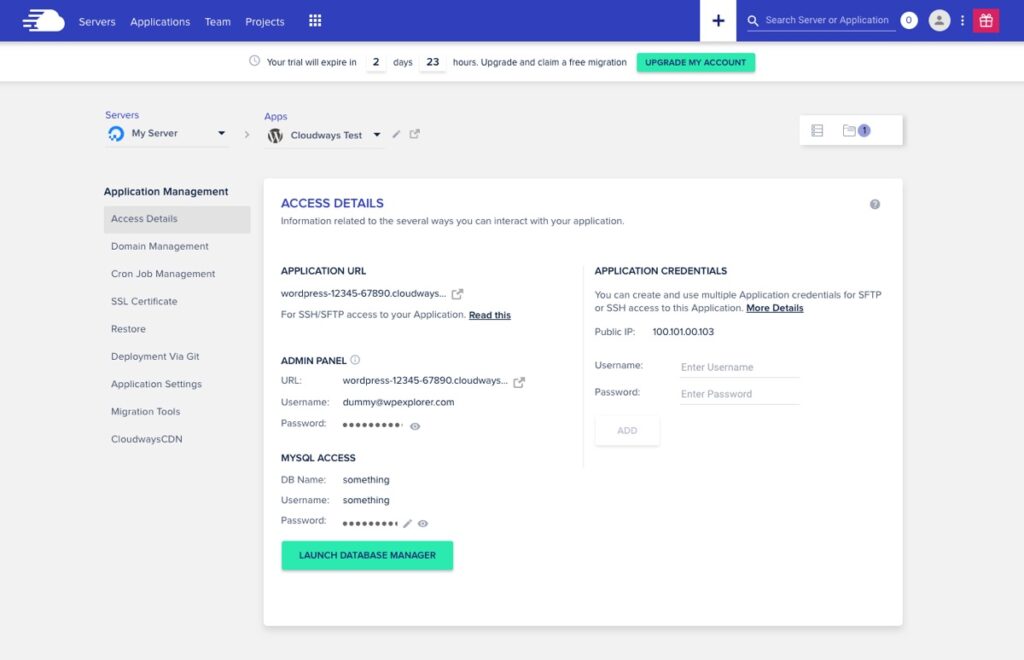
Upon selecting one of your installations, you’ll arrive at the Access Detail screen. Here, you’ll find essential information about your setup, including your temporary URL, Admin login credentials for your site, and MySQL details.
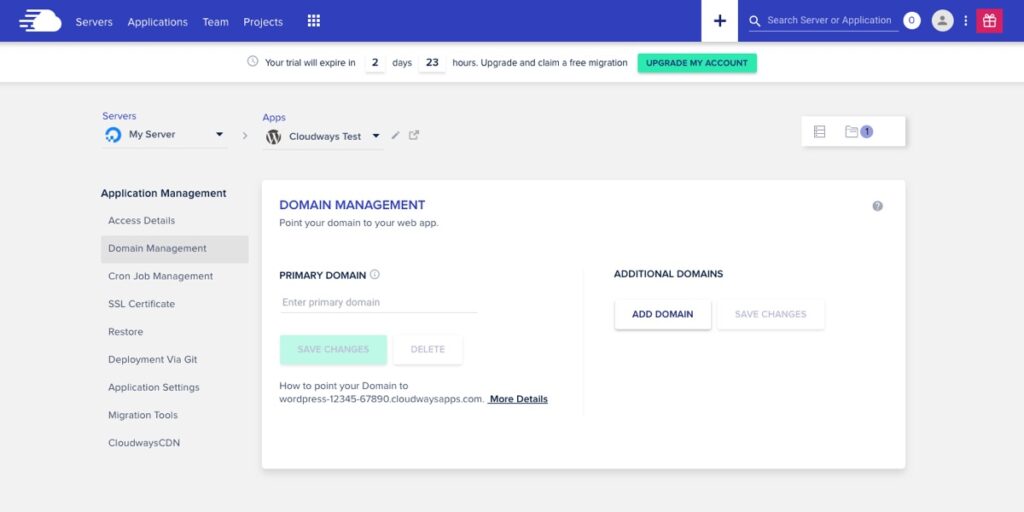
Initially, your Cloudways server installations are configured as staging sites on the main Cloudwaysapps domain. When the time comes to transition to a live site, you’ll need to visit the Domain Management tab to add your URL. Just ensure you redirect your domain accordingly.
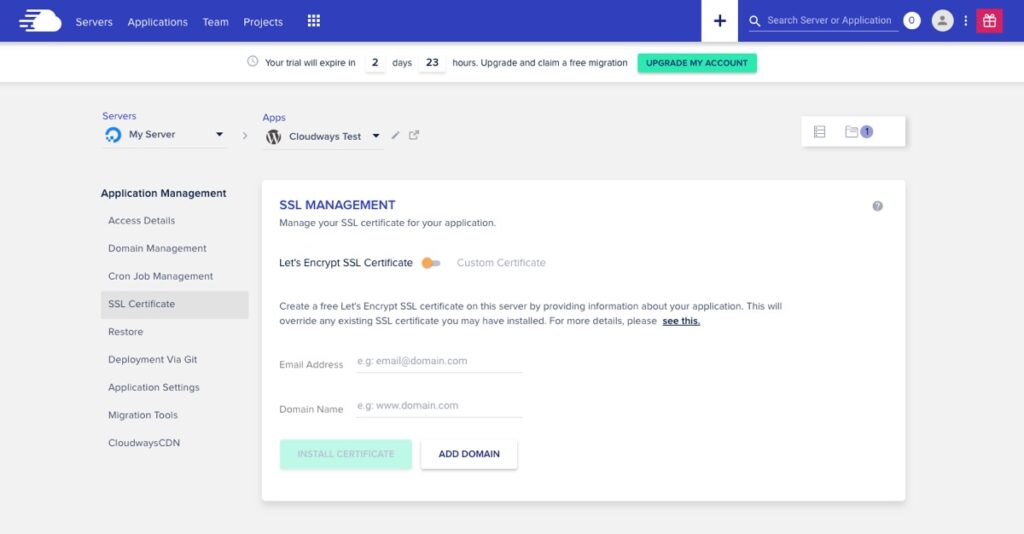
SSL certificates are increasingly becoming a must-have for blogs and websites, serving as a badge of security for visitors. It ensures that the connection between a visitor’s browser and your server is encrypted, safeguarding any data exchanged. To equip your Cloudways-hosted website with this layer of security, simply navigate to the SSL Certificate section within your Application Manager. There, the integrated tool allows you to easily generate a free SSL certificate via Let’s Encrypt by entering the required information and following the prompts.
If you prefer using a custom certificate, the SSL section also provides an option to upload one. This route involves generating a Certificate Signing Request, obtaining an SSL certificate from a third-party service, and then installing it on your server.
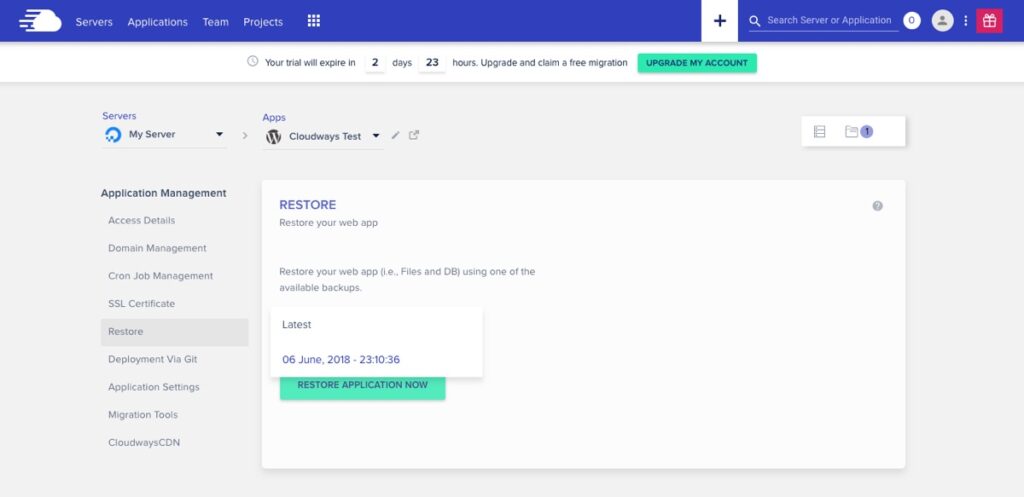
Among the features you’ll likely find useful are the Migration Tools and Restore tabs, both of which are straightforward in their function. If you’re new to Cloudways, their free migrator plugin facilitates the transfer of your website from your previous host to your new Cloudways server. However, considering your first migration is assisted and free of charge, it might be preferable to allow Cloudways to manage the process if you’re moving just one site. Should you need to revert your website to a previous state at any point, simply access the Restore tab, select a backup from the dropdown menu, and proceed with the restoration.
Developers may find additional Cloudways tools particularly beneficial. The Cron Job manager simplifies the process of scheduling tasks, such as deleting temporary files or dispatching email notifications. The Deployment via Git tab streamlines the creation of your SSH key required for repository connections, while the Application Settings tab provides an option to deactivate Varnish caching during testing or staging phases.
Before diving into setting up your WordPress, there are a few more features within the main Cloudways account console worth highlighting.
Adding Team Members To A Cloudways Server
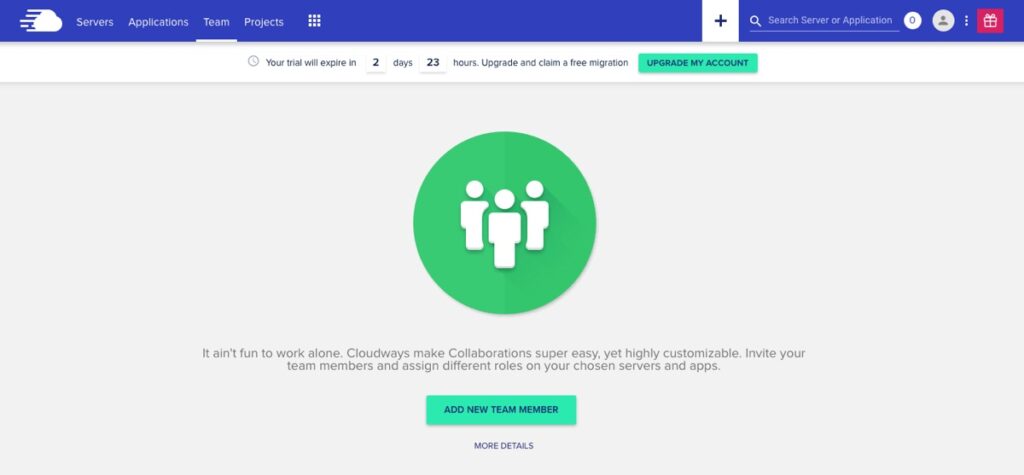
When managing multiple projects with a team, the Team module in Cloudways presents an invaluable set of features. This tool enables you to incorporate team members, adjust their permissions for distinct servers or applications, and define their operational limits with server access. Notably, it’s prudent to reserve certain permissions, like scaling or deleting servers, exclusively for the master admin, ensuring a streamlined and secure workflow.
Managing Projects With Cloudways
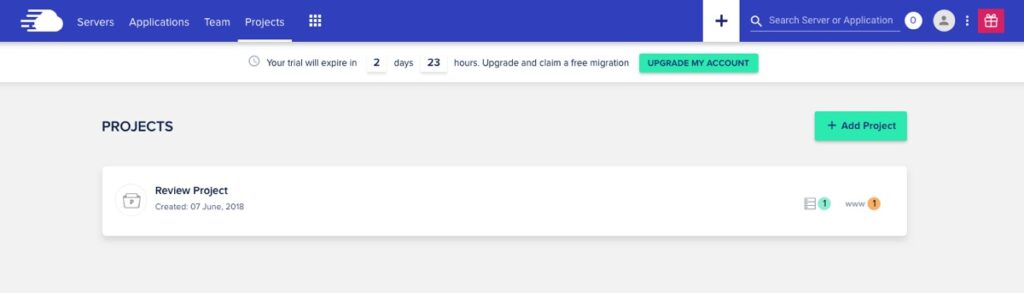
The final console feature to explore is the Projects management page, where you can quickly overview all your active projects. By clicking on a project, you can access its associated applications or modify the project’s name. This functionality primarily aids in organizing your installations, allowing you to easily identify which projects are associated with which clients at a glance.
WordPress Quick Start Guide
Having explored the key features of your Cloudways console, it’s time to turn our attention to your WordPress site. Return to your Application Manager, select the WordPress installation you wish to manage, and note the Admin Panel username and password provided. Next, click the link to access your WordPress admin area.
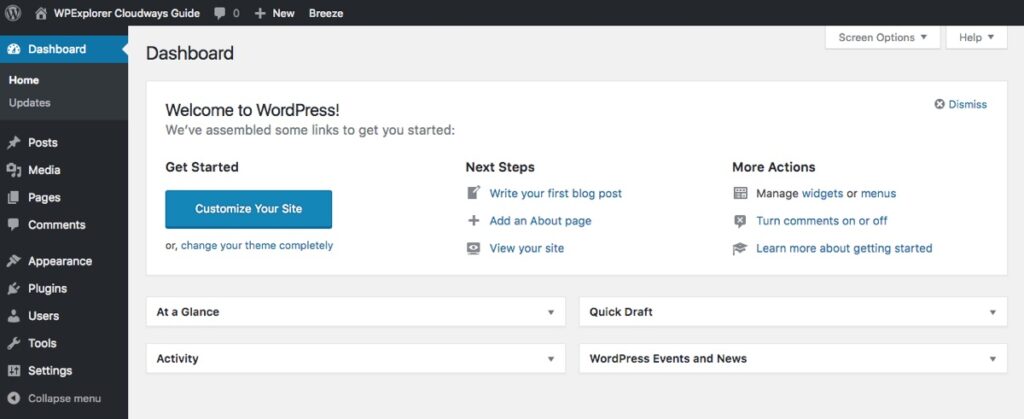
Upon your initial login using the provided credentials, your dashboard will resemble the image previously mentioned. Cloudways ensures the installation of the most recent WordPress version along with their Breeze Cache plugin (if you prefer another caching plugin, remember to deactivate and remove Breeze to avoid conflicts).
The first order of business is to tidy up your installation, setting the stage for your theme and content. Here’s what we suggest for getting started:
- Clear out the default post and page by going to your Posts and Pages sections.
- Adjust your site’s General settings, including the site title and tagline, and set your Permalinks to use the post name structure for better SEO.
With these initial steps completed, you’re ready to install your chosen WordPress theme and any additional plugins you may need.
How To Install A WordPress Theme
Installing a theme in WordPress is straightforward. Simply head over to Appearance > Themes and click on the “Add New” button. This allows you to explore free themes offered by WordPress.org, or you can opt to upload your own WordPress theme by clicking on the “Upload Theme” button.
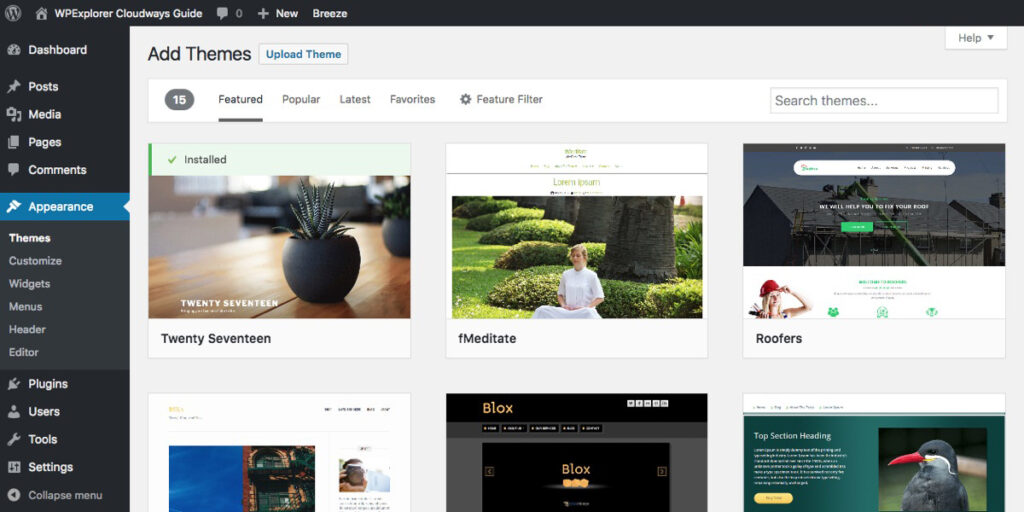
The web is filled with an abundance of excellent WordPress theme choices, making the decision process somewhat daunting. To get started on selecting the right WordPress theme, consider browsing through collections of top-rated WordPress themes, or even experimenting with some free options available.
When you’ve pinpointed the perfect theme for your website (for instance, we’re particularly fond of our Total multipurpose WordPress theme), you’re ready to proceed with installation. Ensure that the theme file you’re uploading is in a .zip format, which is the standard for WordPress themes.
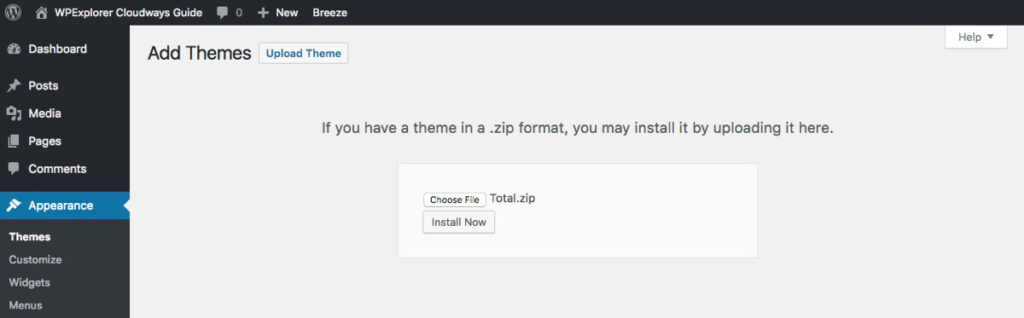
Simply click the “Choose File” button, navigate to your theme’s zip file, and then click “Install Now.“

If you encounter a 413 error as shown above, there’s no need for concern. This error indicates that the theme file you attempted to upload exceeds the maximum upload size currently allowed by your server.
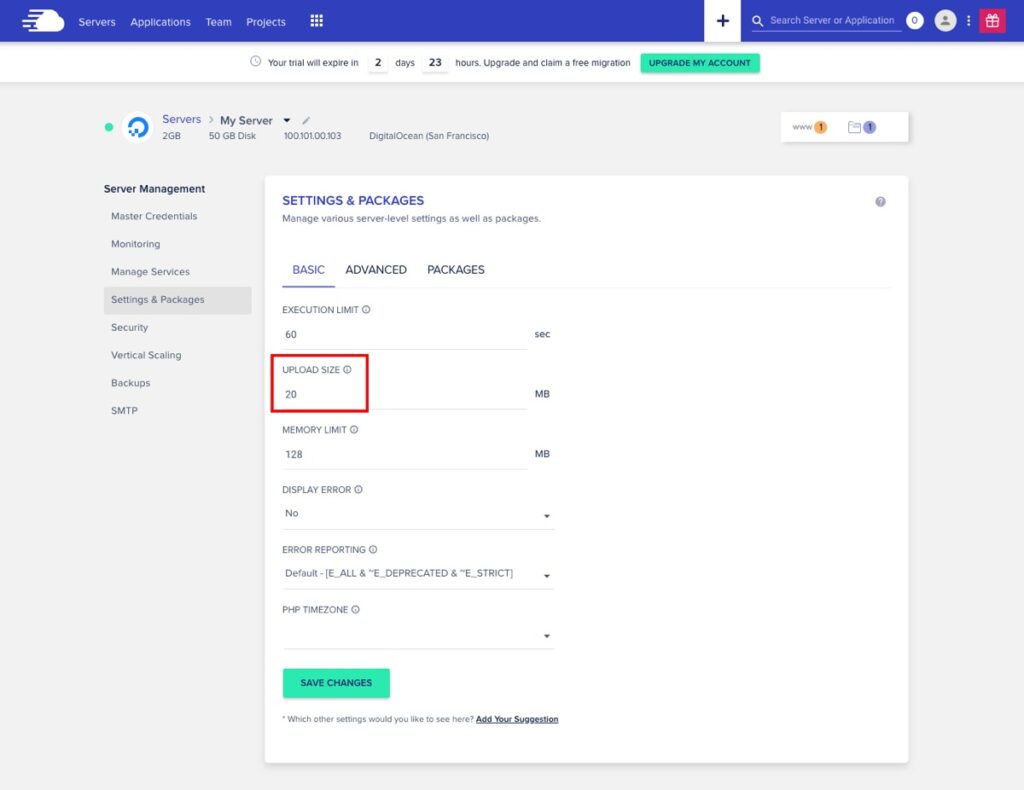
To resolve this issue, simply return to your Cloudways account, navigate to the Servers section, choose the server in question, and proceed to Settings & Packages. From there, increase your file upload size limit to 20 MB and click save.
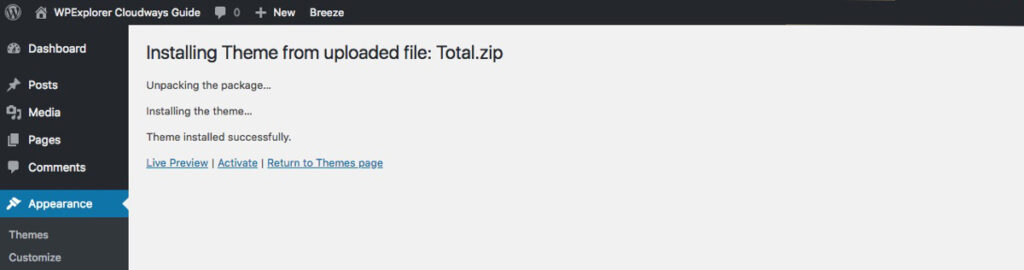
Now, return to your WordPress installation, re-upload your theme’s zip file, and click “Install Now.” This time, the process should complete without issues, and you’ll be directed to the theme confirmation page. Simply click to activate your new theme! With this setup, you’re ready to begin adding content or perhaps installing some useful WordPress plugins.
How To Install WordPress Plugins
Installing WordPress plugins follows a process similar to that of themes, enabling you to enhance your website with a wide range of functionalities and features.
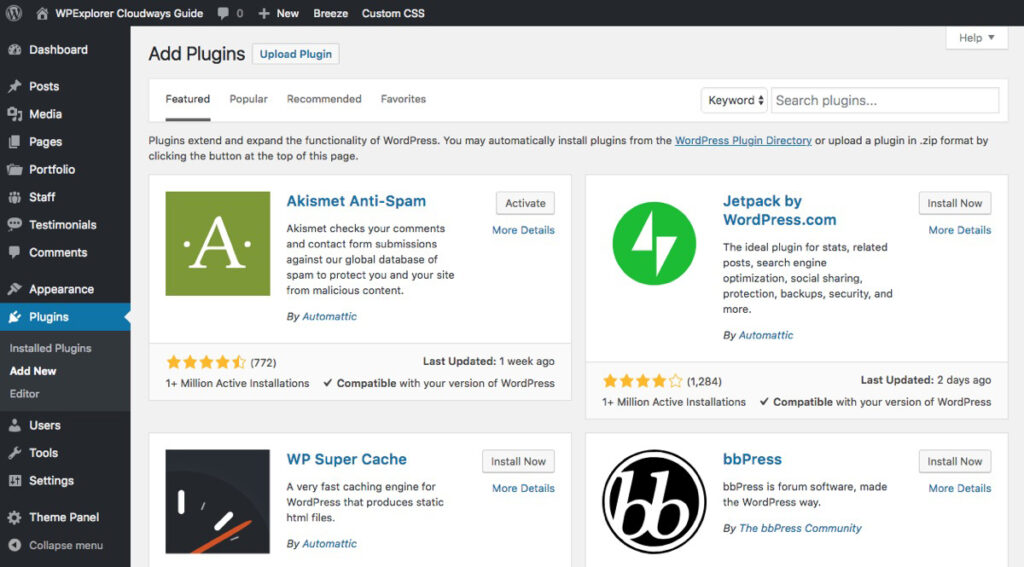
Navigate from your dashboard to Plugins > Add New to explore the array of free plugins available on WordPress.org. Similar to themes, the web offers a rich selection of both free and premium plugins. To kickstart your selection, here are a few top picks recommended by our authors:
- Over 50 Essential WordPress Plugins for Your Site
- Supercharge Your WordPress Comments with These 15 Plugins
- Top WordPress Translation Plugins for a Multilingual Website
- 9 Must-Have Free WordPress Slider Plugins
- More Than 10 Top Anti-Spam WordPress Plugins
- The Best WordPress Plugins for GDPR Compliance
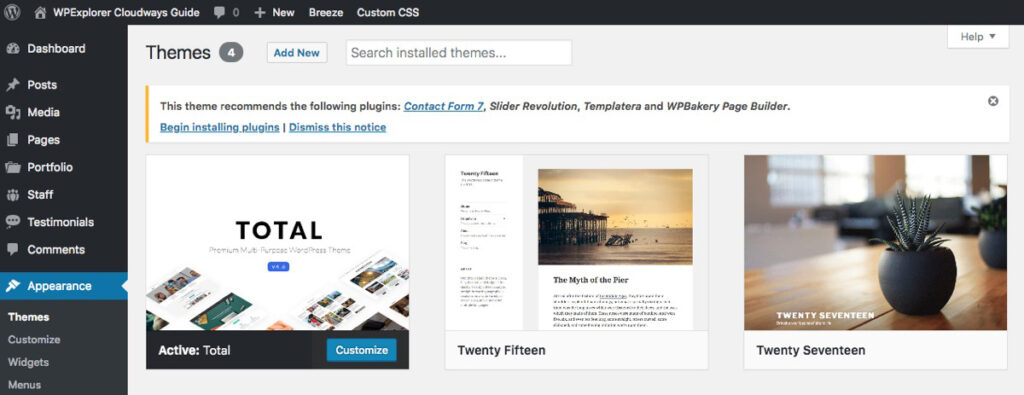
Additionally, if your premium theme includes bundlㅇed premium plugins (such as Total, which incorporates the robust WPBakery page builder), be sure to heed any on-screen instructions or notifications to install those plugins.
Building Your WordPress Site
Now that your theme and plugins are installed and activated, you’re ready to begin constructing your website. Should your theme include sample data, consider uploading it by navigating to Tools > Import > WordPress, where you can upload the sample .xml file provided with your theme.
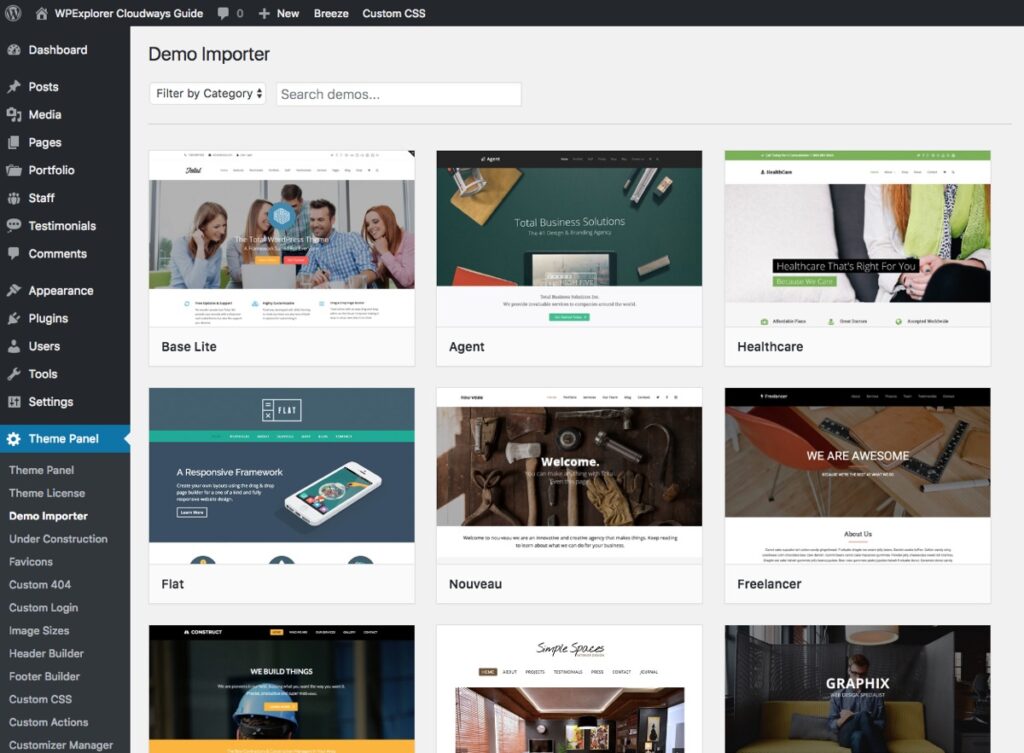
Alternatively, if you’re utilizing a theme like Total, which offers more than 40 sample demos through its integrated demo importer, you can select and import your preferred demo directly through the theme’s settings. In Total, this option is located under Theme Panel > Demo Importer.
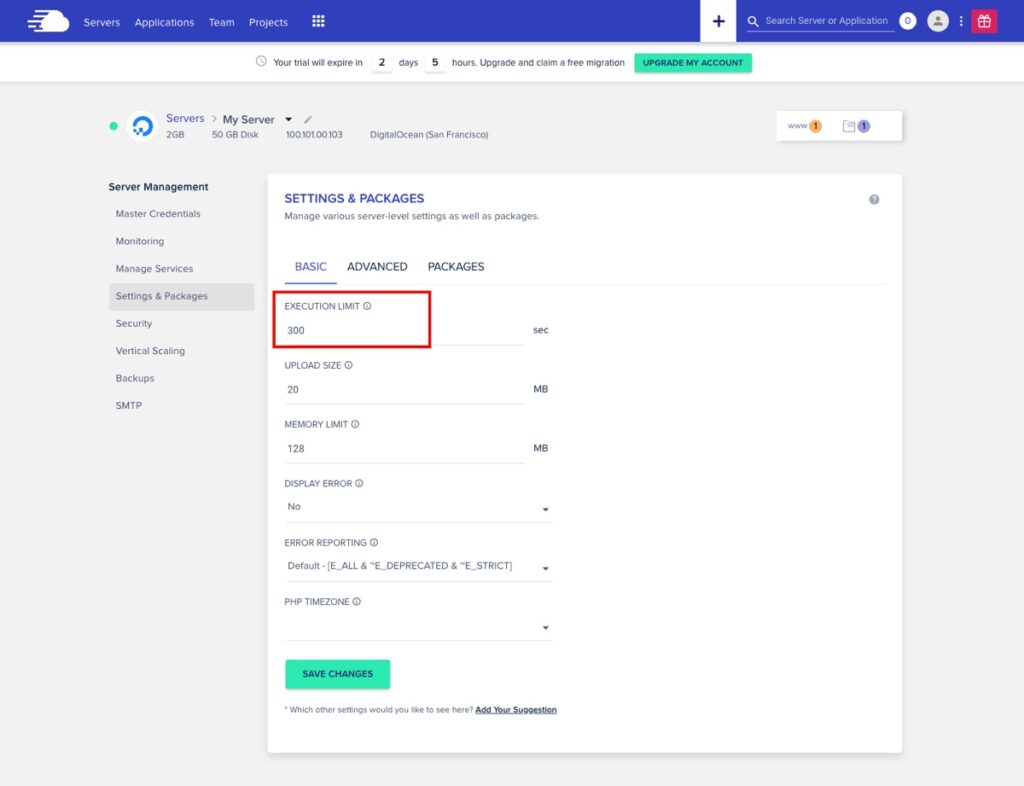
If you experience server timeouts during the upload of sample data, you can easily circumvent this by extending the maximum execution time for your server. Log into your Cloudways account, navigate to your server, and access Settings & Packages to modify your Execution Limit to 300 seconds for added safety.
You may also want to explore the styling options for your theme and plugins by going to Appearance > Customize, along with any other settings available through a custom panel in your dashboard. Once your website’s aesthetics are set, you’re all set to start populating it with your content.
Blogging Tips
No matter the focus of your website, there’s a wealth of advice online covering blogging, developing your unique writing style, monetizing your blog, and more. To kickstart your journey, here are some recommendations from our authors — and remember, a simple Google search will reveal thousands more insightful articles:
- Essential WordPress Blogging Tips for a Successful Blog
- Over 10 Strategies to Boost Trust and Credibility for Your WordPress Blog
- Strategies for Earning Income with Your WordPress Blog
- Content Marketing Strategies for Small Businesses Leveraging WordPress
- Steps to Becoming a Prosperous Blogpreneur and Profiting with WordPress
Wrapping Up
After exploring the information provided, you should now have a clearer understanding of what Cloudways offers to WordPress users and the steps to begin with WordPress on Cloudways’ managed cloud hosting.
I’m thoroughly impressed with the user-friendly server console and the swift WordPress setup process. Personally, I rate them a perfect 5/5 as a hosting provider. With an array of features designed for server scaling, SSL, team collaboration, and more, Cloudways stands out as an excellent choice for both newcomers and small businesses, as well as for seasoned design agencies managing numerous client sites.
For more details or to start your journey, visit the Cloudways website. You can begin with a 3-day trial, free of charge, by simply signing up with your email—no credit card necessary.
Beginner’s Guide Step
- Pick Your Blog Name and Platform (Beginner’s Guide Step 1)
- Install WordPress Blogging Software (Beginner’s Guide Step 2)
- Selecting Your WordPress Theme (Beginner’s Guide Step 3)
- Creating Your First Blog Post (Beginner’s Guide Step 4)
- Plugins & Customizations (Beginner’s Guide Step 5)
- Making Money From Your Blog (Beginner’s Guide Step 6)